Connection between peers
In order to be part of the network, you need to be connected to other people (peers). The underlying protocol for finding peers was taken from App-To-App Communicator. This network overlay enables a peer to discover more peers through peers they are already connected with. By default firewalls will block incoming connections from unknown sources. The protocol makes use of UDP hole punching to circumvent this and setup direct connections between peers. Basically this uses a mutual friend to initiate a connection between two peers who are unknown to each other.
The protocol consists of the following messages:
IntroductionRequest- Request for an introduction to some new peer.IntroductionResponse- Response with a new peer that could be connected to.PunctureRequest- Request to send a puncture to some peer.Puncture- A basically empty message, used to punch a hole in the NAT/firewall of the sender.
When a peer initially starts up the app, it needs to find other peers to connect to. For this initial peer discovery a bootstrap server is used. This bootstrap server resides on a fixed IP and introduces new peers to each other when they initially connect to the network.
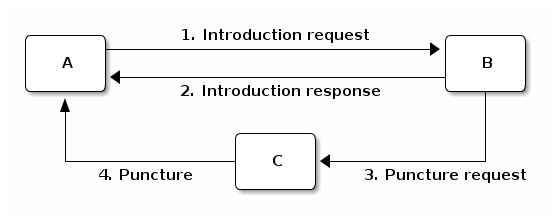
The following steps explain how a typical introduction goes down:
- Peer A knows of some peer B and asks for a new connection to be setup.
- Upon connection peer B chooses a peer from its active connections, peer C, and sends the address of peer C to peer A as an introduction response message.
- Peer B sends peer C a puncture request for peer A.
- Peer C sends a puncture message to peer A to punch a hole in its own NAT/firewall, allowing the incoming connection from peer A.
Connections overview
After starting the app and choosing a username a screen is shown with an overview of all current connections. The screens is divided into two columns. The left column shows peers which are actively connected with you. The right screen shows peers, which you have heard about, but have yet to respond to you. They have been introduced to you through the IntroductionRequest message.
In order to prevent sending messages indefinitely to peers who aren’t responding peers can time-out, the bootstrap server will never time-out. Every five seconds a message is send to 10 random peers asking for an introduction to more peers. This is limited to 10, because otherwise a large network will be sending a lot of traffic. (imagine 100 peers sending about 1kb size messagse to 100 other peers every 5 seconds for an hour) These introduction requests also act as a heartbeat timer keeping track of which peers are still alive. If no messages were received from a peer for 25 seconds the connection is deemed to be lost and the peer will be removed from the list. A new introduction would have to take place to reconnect to the peer.
For each peer the following information is displayed and updated every second:
Status light
- green when a message was received in the last 15 seconds
- orange when peer is new, but hasn’t responded yet
- red when no message was received in the last 15 seconds, a strong indicator that the connection is lost
Username - The username the peer chose when first starting the app
Connection indicator - Information about the type of connection, e.g. WiFi or mobile. In case the peer is set as a bootstrap server next to the username the word “Server” is displayed
Ip address - public ip address of the peer, plus the port of the connection
Last received and sent - In the bottom row two timers can be found indicating the time since the last message was received from and when the last message was sent to the peer.
Received and sent indicators - The UI shows when messages are send to a peer by changing the color of the last recieved and last sent timers when a message is received in the past 500 ms.
Background handling of peers
All operation that are done on peers are done through or make use of the PeerHandler class. This class holds an arraylist of peers currently known and can split these peers into two lists of active peers and new peers. Peers are kept in memory for now, so each time the app is closed all peers have to be rediscovered through the bootstrap server.
There are two ways the host can hear about new peers:
- When a message is received, the sending peer becomes known
- An introductionResponse message, which contains a list of peers that the sending peer is connected with
Note that in the latter case a puncture request is still only sent to one peer (the invitee).
Each time a peer is ‘introduced’ through either method the getOrMakePeer function of the PeerHandler is called. This function does one of four things:
- The peer is already known, so the object associated with this known peer is returned
- The peer is already known based on its id, but with a different InetAddress, the associated object is updated and returned
- The peer is already known based on its address, but with a different id, the associated object is updated and returned
- The peer is unknown, a new Peer object is created, added to the PeerList and returned
This way a host keeps track of all peers that ever interacted with them and keeps the information up-to-date.
For each peer the following information is stored:
- address - the InetSocketAddress where this peer can be reached
- peerId - the identifier of this peer
- lastSendTime - the last time a message was send to this peer
- lastReceiveTime - the last time a message was received from this peer
- long creationTime - the time this peer was first introduced to this host
Every second the peer list is checked for dead peers. Dead peers are peers from which no message was received in the last 25 seconds. These dead peers are removed from the peerlist.
Background handling of messages
Since all messages are created using protocolbuffers, it is easy to rebuild them on reception. When a message is received, the message type is checked and the appropriate functions are called to further handle the message. Messages not build with (the correct) protocolbuffers will simply be discarded.
Message transmission
Network
Messages are sent over the network using UDP datagrams. Currently, one message is sent in one datagram, putting an upper limit on the message size of 65KB, the maximum UDP datagram size. The message is sent in the Network class’ sendMessage method.
Offline transmission
The app also provides functionality to transmit blocks offline. A checkbox in the PeerSummaryActivity activates this functionality. Offline sending can be performed in two ways, one is using QR codes and the other is using Android Beam.
QR code transmission uses the QR generator located in the funds.qr package. The maximum size of data contained in a QR code is limited to about 3 kilobytes, so this has an even stricter maximum size then the network’s UDP transmissions.
Android Beam transmits data using either NFC or Bluetooth, allowing a practically infinite maximum message size (no physical maximum has been identified), although anything above 65KB will create problems when announcing the chain to other peers. Of course both the sending and receiving party need to support the required technologies.
As hinted above, the blocks exchanged offline do not stay offline, but are automatically shared with all connected peers if there is an internet connection. Therefore the offline send feature should only be used when there is no network connection available, not for keeping the exchanged block secret from other peers.
Networking classes and their responsibilities
There are two main classes which have to do with networking. Network and MessageHandler.
The Network class is a singleton class and is responsible for sending and receiving messages. It has a datagram channel which has a socket bound to a local port (default 1873). Through this channel messages are send and received to and from peers. The network class has methods to build the different messages of the protocol.
The MessageHandler is responsible for handling the messages after they have been deserialized. It decides on how to respond to a received message.
Stress Testing
The stress testing feature allows to spin up any desired number of nodes. These nodes start in the StressTestNode <TODO_add_link> class, they use their own instances of the Network class and provide the StressTestNode instance as a PeerListener, instead of the normal OverviewconnectionActivity. They act just like a normal node, except having no visual displays and generating a new temporary keypair.
Statistics
The Network class logs al its sent and received messages into the singleton StatisticsServer <TODO_add_link> class. Messages are logged by type and separate statistics are kept for al running nodes. Additional logged data is the number of sent and received bytes and the number of active and new connections. All this data is tallied and shown on the StressTestActivity, updated periodically.
- Statistics are NOT displayed on phones running API 23 or less, as tallying uses a reduce function not available on API 23 or less.
- Note that running many nodes may slow the phone down dramatically and statistic updates may come in extremely slowly or not at all.
Logging and graph generation
The StatisticsServer class runs a logging task that prints all statistics, in csv format, to the console at a fixed time interval. This csv data can be used to generate graphs to visually show the data using generategraph.py from the python folder, using the following steps:
- Get data of the desired node by filtering the log output on ‘Statistics-<desired username>’
- Copy the data to a text file in the python folder (the timestamps can be left in) and change the filename in the python script
- Run ‘python generategraph.py <column name>’ to generate a graph for the given node and column
example: ‘python generategraph.py messagesSent messagesReceived’
In order to take all nodes into account generategraph_aggregate.py is provided. This script takes a data file that contains the logs of an arbitrary number of nodes, and calculates the averages and standard deviations of the requested columns. - Please note that this script is more hacky than generategraph.py, may contain bugs and does not offer custom ticks on the x and y axis. - Please also note that this script has ‘stress_test_user_0’ hardcoded as node name and (ab)uses this on order to fill the array of x values. In order for this script to work reliably, the hardcoded username value should always be the first log in each series of log updates. - Make sure that the resulting file used to create the graph contains only one header line containing the column names.
The steps to create graphs are the same as above, except that the recommended filter is ‘Statistics-stress_test’ in order to filter out the main node (including it will cause some issues since this node is started much earlier than the rest)
Conclusion
A problem of the current implementation is that each connected peer sends around one kilobyte of data every 10 seconds. Suppose we have 100 clients which are all connected, then this would mean we would send 100 * 1 * 6 = 600 kilobytes every minute. If a device is on a 4G connection this would consume too much data.
A solution to this problem could be to send less messages. For example, it is possible to send every minute a message to a peer instead of every 10 seconds. This could work since it is not necessary to check if a peer is alive every 10 seconds. Another solution is to send smaller messages over the network. However, protocol buffers is used to generate, send, and receive the messages, removing protocol buffers means a lot of new code has to be added to generate, send, and receive the messages.
Another problem is that messages are send to 10 random peers. A better solution is to send messages to peers we have not send a message in a while. A further improvement could be to send a message to more than 10 peers every 10 seconds, but ultimately this does not scale well.